Monday 26 August 2013

UDK Audio Tutorial: Introduction + Basic Level Design

Introduction: For me, there is nothing more fun and rewarding than creating interactive audio. Not only are you making something sound good, but you're allowing others to take this and make it their own - something that other mediums of sound simply can't achieve. From recording, to editing, to mixing and finally building systems, the process is varied and satisfying. Here, I'll be going through everything you need to know about creating simple sound systems in UDK.

Before I get straight into it, I've detailed below a list of the kinds of things I'll be covering, from the basics on to more advanced subjects:
  1. Getting to know UDK: Basic Level Design - In this first post, I'll be covering the basics of the Unreal Development Kit and tools to create simple levels using the builder brush.
  2. Getting to know UDK: Soundcues, Kismet and the rest -  In the content browser, we'll go into setting up internal sound systems that act independently, and why they're important for workflow. Also using kismet, I'll implement some simple systems, while explaining some key modules that are useful for all aspects of interactive sound design.
  3. Setting the Scene - the most basic use of sound in games is ambiance, or setting a 'sound background' for all other sounds to sit on. I'll explain how to create them and best practices for volume, frequency and content.
  4. Music - Another key element of a games sound is it's soundtrack. The way in which this is implemented varies from game to game, so I'll cover a few instances.
  5. Foley - The little details certainly create a bigger picture, especially in audio. I'll create some systems and discuss audio file creation, lengths and frequency to help make the most of your recordings while making it appropriate during gameplay.
  6. An Interactive Environment - Using everything detailed in previous posts, I'll create an interactive environment that I'll make available for download so you can interact with it too!
As I write these posts, they'll probably evolve and more things will be covered than first planned, so expect to see more than just 6 posts. I could do 6 posts alone on foley!

Getting to know UDK

Before you can create your soundscapes, it's good to get to know your tools. One of the things I love about UDK is that it's relatively simple to create block worlds quickly with playable results without a huge amount of prior training. You can also work out systems that would otherwise entail coding, instead using object based design in 'Kismet' (which I'll be using for our sound systems). All in all, it's very user friendly and is completely free to design games in, so it's a sure fire for any beginner in whatever aspect of game design you'd like to persue.

Installing UDK: In order to download and install UDK, simply go to the UDK Download Page and get the July beta (I'll be using July through these tutorials as it was the latest at the time of writing). The process of installing is as you might expect; the only questionable section is the perforce installation. You can go ahead with this if you choose, but I won't be using this in the tutorials. For more information on Perforce, check out their website.

Opening UDK and Creating a New Level: When you first open UDK, you'll be greated with 3 windows:

What you'll be greeted with when UDK loads up.

The main window at the back is used for the level design and physical placement of items. The second window from the front is the Content Browser: this contains all of your assets, such as meshes (items that can be placed in the world), textures, animations and sounds. Finally in the foreground, we have the start up window. this gives you quick access to the creation of new levels, opening existing levels, video tutorials and more.

The other important window that we'll be using quite a lot is the Kismet window. As discussed, this is used for creating reasonably complicated systems using object oriented programming. An example of this is shown below:

An example of a kismet system. This particular one reduces your health by 5 every second if you're within a set radius of an object.

So why cover level design tips for an Audio Tutorial? The thing that sets game audio apart from creating a song or designing sound for film is that, if you don't have an environment to work with, you can't really create the systems necessary. Now you may say that without film, you can't create film sound, which is a valid point. But it's so easy to create a simple game level, that it's not worth overlooking. When I started my interactive audio module at university, the first thing we were taught was basic level design, as it gave us much more freedom and flexibility over the systems we designed. The other advantage to knowing these techniques is the breadth of tools it introduces you to, which gives a much broader picture of game design as a whole. If you're already adept with level design, you can of course skip this post and go straight onto the next one, detailing kismet and other elements.

For this tutorial, we're going to start by creating a new map. You'll be greeted with a choice of new maps, 4 of which include a basic floor and static-mesh block with a different time of day for each, with the last being a blank canvas. To make things easier (as I'm not covering much level design), we'll just go straight into a pre-built one.

Here, you can choose a pre-made level, or start with nothing.

The first thing you'll see is the 3D view. This is used to view a close representation of what your final level will look like, including any invisible volume and nodes. We can hide and show a plethora of different features so you can find exactly what you need.

The main editor window, with a pre-made level loaded.

However, to really help with workflow, were going to show the other views. By clicking on the button in the top right corner (shown below) 3 other views will be shown. These provide a texture-less perspective from the top, front and left side of your level.

With this view, you can see a 3D adaptation of the level, as well as 3 perspectives with texture-less models.

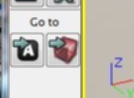
Creating a Simple Block Level: The best tool for the job in creating a level is the builder brush. This is used simply to create blocks of varying sizes and shapes, and can be manipulated using various methods. For our level, the builder brush is currently on the cube in the middle. Clicking on the Go To Builder Brush button (shown right, right button) will take you to it (no matter where in the level) and will automatically select it.

The Builder Brush can be changed into many shapes. You can see these on the middle-left (turquoise coloured buttons).
Here, I've simply moved the builder brush out of the cube. As you can see, it's a texture-less entity which gives an outline as to the shape it will create; you'll also see some controls in the centre. For everything you select in the editor, a set of controls will appear to allow manipulation, for which there are 3 kinds available - Displacement, Angular and Scaling. A forth is available, which allows you to scale an object separately in the x, y and z axis.


Have a mess around with these tools to see what kinds of cuboids you can get. There are also preset shapes you can use, detailed in buttons on the left-side toolbar, such as spheres, cylinders and stairs. Once you have a shape you'd like, you can then create a static object. The quickest way to do this is by pressing Ctrl + A. As you'll see, the area is filled with a blue and white checkered block.

The builder brush defaults the created object to have this texture and stretch it across each plane. You can however change these textures and methods of application in the texture properties window.

You can now move the builder brush around and create more blocks the same way. Another great feature is the ability to cut out holes in these blocks. In the below screenshot, you'll see I've simply changed the angle of the builder brush and 'subtracted' this area from the one created previously. You can achieve this by pressing Ctrl + S.


I use this feature a lot for creating doorways and windows, but as you might imagine, it can be used very creatively even for such a basic element of the engine. It's a very quick and easy way for drafting a level which will aid in the design and implementation of systems.  Below is an example of something we can use for a building with exterior and interior walls, an entrance and an exit.

Of course, you can intersect these blocks if you wish. This makes it easier to prevent unwanted light leakage or stopping the player from becoming stuck in gaps.

When you're happy with the layout of your blocks and want to have a play-test, all you have to do is press the green play button at the top of the editor window and you're in. You can run around and view what is the start of your creation!

This particular screen has had a full lighting refresh - a process of rendering which you can do in the 'Build' menu. By doing so, the engine reads the lights refraction's, giving a much more realistic look to your level.

More uses of the Builder Brush: It's great fun to create these levels with the builder brush. However, it's much more powerful than this, and you'll find yourself using it for much more than physically building blocks. A lot of the use will be for volumes: trigger volumes, water volumes, reverb volumes and many more. Each of these have a distinct function to help you design systems and gameplay. Particularly though, trigger volumes will be used more than most for setting off the sound systems I'll detail in coming posts.

This is what a trigger volume looks like. In a later post, I'll be hooking this up to a system in kismet as the start point, or trigger as such.

Static Meshes from the Content Browser: Another way of 'furnishing' your level is with the use of static meshes: these are complicated textured 3D models that are anything from a door, window, table, engine, car; basically any object that isn't created with the Builder Brush. These are stored in the content browser, and can be found by using a filter tick-box at the top. To put them in your level, you can either select the object (which will stay selected even if you close the content browser) and right-click in the level to add it, or you can simply drag it in from the content browser.

In the content browser, clicking on the 'static meshes' tick box reveals all the static mesh files available.

Here, I've added 3 of the same static meshes; barrels in this instance. The medium sized one is the original, with the other 2 scaled appropriately and angled slightly. 

Conclusions: So that just about covers basic level design without getting too much into more complicated systems. I will carry on level design slightly in the next post, covering matinee (the tool used to animate objects) and integrating it into Kismet. Mostly though, I'll be going over Kismets many different modules and how I've used them in the past to overcome certain challenges (namely footsteps!).

Please don't forget to contact if you have any questions or would like to add anything; I very much appreciate your feedback!

Alex.

Monday 19 August 2013

Editing and Mixing Sound: Frequency, Volume and Content

From a large action sequence to a subtle conversation, a huge amount of thinking and planning goes into the sound design to create an engaging, believable and pleasant listening experience. Not only does pacing need to be accounted for, as well as which sounds are needed, but considerations for the frequency and volume are paramount to getting a good mix.

Let's take a couple of examples, mentioned above; an action sequence and a subtle conversation. These are both quite distant in terms of content and frequency, and must be planned thoroughly as such. I'll break each down into relevant components so it's easier to account for.

The Action Sequence:


Set the scene: Let's take a place of action similar to one of the fight sequences in 'Inception'; it's raining, there are many cars driving around with 3 or 4 chasing the main characters in their car. Of course, these cars are crashing into other cars and objects, while the 'henchmen' all have guns of varying power, attempting to kill our protagonists'.

I must first stress something - this is only one of many ways to go about designing, composing and implementing the sound for a scene, regardless of it being an action sequence. It's really up to the director and the way he wants to take the action, or the Lead Sound Designer who may have a particular vision or style. A lot of other films might have had fast paced music over the top of this, but Richard King (the Sound Designer behind Inception) went with a more dynamic approach; bringing forth a much higher impact than if designed otherwise.

Break down into layers:
  • Ambience - Throughout the scene, rain is falling fairly heavily. However, you'll notice the sound is particularly low in volume. The reason for this is to help enhance the dynamic range, which (as stated previously) in necessary for the impactive sounds. In fact, the ambience will likely be taken out at sections where the sound gets busy (crashing, gun fire, louder sounds in general). The same goes for the section where the train appears. Just before this occurs, you'll notice the dynamic range is heightened by leaving only the ambience in at a low volume before the train crashes into the initial cars.
  • Dialogue - Although there isn't much in this section, the dialogue is seemingly set back in the mix, which is another device to increase the impact that crashing and gun fire has.
  • Foley - This is a part of the sound that takes some picking and choosing. Much like a camera can focus on one part of an image, sound (when designed effectively) will do the same. If there is a man walking in the back of a shot out of focus, you generally wouldn't place footsteps on him. Similarly, if 5 or 6 people are shooting guns, but the camera is focus on a particular person, the sound would be mixed towards this person with their gun being loudest and possibly even leaving the sound out altogether for some of the other guns.
  • SFX (explosions, crashes) - In this scene, explosions, crashes and gun fire certainly take precedence. My way of thinking about a mix is to concentrate on the loudest and most prominent sounds, and then add other sounds around them. This way, you get a sense of perspective and shouldn't make too many mistakes in the way of bringing down the dynamic range.
Frequency Content: There are quite a lot of thing going on here. One thing is getting the sounds in, synced and mixed in volume, but making sure they don't clash in the frequency range is hugely important.
Let's consider the ambience first of all. This sets the initial scene, much like a backdrop at a theatre will do. However, you wouldn't have any bright objects or 'loud' images on this, as it would take the attention away from actors and props on stage. So in terms of frequency, you need to leave quite a lot of room for other sounds to happen, such as dialogue, foley and SFX. Therefore, you'll want a low-to-mid range frequency band - this leaves room for low frequency explosions, mid-to-high dialogue and the high-frequency chinks of bullets landing on the tarmac. In short, you'll want the ambience to accommodate all the other sounds; surround them, fill in the gaps.
Dialogue and foley will have a similar frequency range, but different from other scenes or mediums. These would usually take up more of the lower end, taking advantage of the proximity effect in Dialogue or intimacy in foley. However, for this type of scene, any lower frequencies would be EQ'd out (or recorded as such) to leave space for explosions and gun fire.
I've said it enough already, so let's finally get to SFX. These will take up the largest range of frequencies, as the breadth of SFX is quite large in this instance. Explosions, for example, will take up the majority of the lower end, with car crashes similarly lower but with higher crunching sounds layered over. Car engines would usually take up the lower end, but with so many short bursts of lower frequencies, they've designed them to take up more of the mid range. Gun fire will depend on the size of the weapon: hand guns have shorter low-to-mid bursts, with automatic weapons taking up more of the low end.

Fluctuations: As with an overall film, a scene can have fluctuations of frequency content, as to 'fill out' any gaps. For example, I said earlier that cars take up the mid range more here, but for some shorter sections, the frequency tends to the lower-mid. They can get away with this because of so many cuts and perspective changes image wise.

The Subtle Conversation:


Set the scene: As a big fan of the show, I suppose it wouldn't go amiss to use a scene from The (American) Office as an example of subtle conversation - there's certainly a good amount of it through the entire shows catalog of episodes, ranging from whispered chats to shouting battles.

Break down into layers:
  • Ambience - In this instance, ambience takes up quite a lot of room in the mix. In a way, the ambience in The Office is very much a character in itself. That is, it sets the scene and changes dramatically depending upon the circumstances. Most of the time, it's made up of fans and air conditioning, layered with SFX (detailed below). As there isn't much going on in the way of needing a huge dynamic range, the volume is brought up right behind the dialogue, and fills out the remaining frequency range (more on this later).
  • SFX (Copier, Phones, Doors) - These SFX are placed strategically and help further set the scene and create a 3D space around what you see. In fact, this is a great example of sound continuity. When the camera is facing one way, there will always be something going on around and behind it. These SFX are placed almost as jigsaw puzzles to complete that picture. See someone walk off camera towards a door? The designer will carry on the footsteps and use an opening door sound to signal and bring closure to that movement. Back to the point on hand though - the levels tends to be reliant on how far the objects are from the camera, which gives a sense of depth to the room.
  • Dialogue - For intimate conversations, Dialogue takes more priority than any other sound. Here, the volume tends to stay at a similar volume (regardless of speech type such as whispering or shouting). When the camera is taking a close-up, the proximity effect is utilised to give the sense of intimacy through sound.
  • Foley - In some cases, the foley can take as much precedence as the dialogue in terms of volume and content. The Office, as you might imagine, involves a lot of phone, keyboard and paper handling. These sounds are therefore quite high in the mix and are used as focus tools. For example, some scenes don't have a lot of dialogue, and use the foley to tell a miniature story. This can anything from someone pretending to read a magazine while spying, or Kevin eating a cupcake.
Frequency Content: For The Office, there are some distinct differences in the frequency ranges of each component, but they fill the same gaps for the most part. Of course, the only change here is that there aren't any cars crashing or guns firing, so there's little need to take up that lower frequency range of 60Hz and lower (unless someone punches a wall...).
Ambience now takes up a much larger part of the frequency bandwidth, with more lows and low mids that would otherwise be used by explosions and gun fire. Dialogue varies widely now, with shouting from afar being similar to the action sequence (mid range), while close-up shots use the proximity effect, utilising the low-mids and often lower. Keyboards would otherwise have a very 'light' sounds, taking up the mid-to-high frequencies, but here the sound involves some lower-mids too. Clearly with a show like this, they can use more varied frequencies for sounds that would otherwise not use them.

Fluctuations: Changes in sound are as important as changes in the image for a 'Mockumentary' style show such as The Office. With so many swiftly changing shots, quick camera movements and single-shot takes, it's important that the sound stays consistent and varies accordingly for the scene. Particularly with the one-shot takes, where the camera is walked through the office, sound has to change enough to offer an audible picture of the environment it's moving through. A good exercise is to find one of these sequences and watch it without the image - you'll notice a lot happening which would otherwise seem normal with the image; a consideration necessary for the Sound Designer when mixing everything. In fact, you could do this yourself at your own office or workplace: even there, you'll find fluctuations in volume and frequency content.

Conclusions:
From looking at these two examples, we can quickly see some correlations in the needs of a mix for film, TV or even any form of sound scape: regardless of the style, filling out the volume, content and frequency range appropriately is vital. You could argue the same for a song without a bass guitar; instead, the guitar would need to be 'chunkier' and the kick drum would have a more open deep sound to compensate.

These are thoughts you need to consider when designing the sound for your own project - is the frequency range, volume and content fulfilling the mix? Ask yourself this through the entire process: you won't want to be destructive in editing or mixing and find the decision was made in error.

I hope you've enjoyed this post! Please leave a comment if you have any thoughts to add, or better still, let me know of any personal experiences you've had with this kind of thinking.

Next Time: UDK Game Audio! - I'm finally going to dive into my love of interactive sound. This first post in the series of many will briefly touch on best practices of audio before getting to the importing stage and basic implementation of sound in a 3D game world.

Alex.