Saturday 5 April 2014

UDK Audio Tutorial 3: Kismet Introduction

Kismet: Definition; destiny, fate - an event (or a course of events) that will inevitably happen in the future.

Introduction: Especially for beginners in the game design business, Kismet is a very powerful tool in creating all aspects of a game. From opening doors, to spawning enemies, and even laying out complicated cut-scenes, it allows a developer to manipulate the world in a surprising amount of ways. Of course, what I'll be covering here is more to do with audio implementation, but I'll only be scratching the surface.
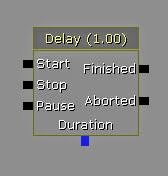
A system in Kismet.
So what is Kismet? - If you imagine all of the parts of a game level are puppets, Kismet is one of the places where the strings are pulled. It's the foundation of all the in's and out's of the programming which makes a level interactive. It uses object-based programming, where by small boxes are connected up with virtual wires, creating a workflow which is quicker and easier than line-by-line programming (Unreal script in this case). Of course, it may not be nearly as powerful as coding, but it's certainly viable to create a game using only Kismet.

The principles of Kismet: To better understand Kismet as a whole, we have to look at the bigger picture - what does it actually do? What comes in and what goes out? How do you know if your system works correctly? All of these questions can be answered by taking a look at the flow of information.

You see, Kismet works in pulses. When a module is activated, it sends a pulse from it's output, which is then transferred down to anything that is connected to it. When the pulse is received, that module is activated and performs whatever purpose it was designed for, be it playing a sound, adding a float figure, comparing values etc. Of course, this is instantaneous, much like switching a light on.

The white outline represents a pulse coming from the 'Clock' module.

Bringing up modules: Now we know how Kismet functions as a processing tool, we can bring up some modules to use. If you're unsure of how to bring up kismet, it's easily accessible at any point - all you have to do is click the 'K' button at the top of the editor window (shown left).

If you've read my Soundcues post, you'll be very familiar with this environment: it's almost exactly the same. You've got an open space for your modules, a properties window at the bottom and modules are placed by right-clicking and choosing the appropriate one. A nice little addition in this case is the use of shortcuts to add 'staple' modules to your systems; I say staple because they're useful for quite a lot of things and will no doubt be used a lot.

The Kismet interface: Here, I've placed 3 modules; Delay, Gate and Play Sound.
You'll also notice there's a much larger selection of modules compared to a Soundcue. In fact, there are so many, they've had to categorize them (some several times) in order to keep them organised. If you're curious, it never hurts to add these modules and check them out - see what they do - see if you can make them work in some way. After all, knowledge is power and I always look for new ways to solve old problems.

Staple modules: As I've said, there are a range of modules that you'll use a lot when designing systems, so I'll go over what they are, what they do and why they're so important.

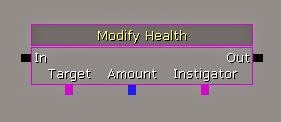
IMAGE FOR EACH MODULE

Level Loaded - This module will be the sole provider of many systems triggering; it simply sends out a pulse when the level has completely loaded and you're in the game. Examples of use might be for a music system which begins on starting the level, or a set of sound loops for ambience implemented in Kismet (a lot of ambience loops don't require kismet).


Play Sound - In order for a soundcue to be triggered and manipulated fully, the best module (and only by default) is the Play Sound module. As you can see, you're able to play and stop your sound, as well as activate modules on the output based upon the playback of the sound. You're also able to show other parameters which are currently hidden, such as the volume level, which can be changed using the math modules (more on that below).


Delay - A very simple module, this adds a defined delay time between being activated and sending the pulse out. These modules are great for setting off a sequence of systems from a single trigger, or you can connect the out to the in and create a loop system, such as looping a non-looped sound or a make-shift if-statement system.


Gate - As with many elements of audio production, the gate is as it sounds - a module that that can either prevent or allow signal to pass through it, depending on it's open or closed state. You'll find yourself joining a lot of your systems together with these, because you can essentially pick and choose which systems to turn on and off. For example, if you have a piece of music playing for ambience, and an enemy pops up, you would open a gate to allow for the 'enemy' music to play, while closing the gate on the ambient music.


Switch - This module (as expected) allows you to switch the input to several different outputs. You can either have the output switch concurrently (i.e. once output 'Link 1' has been activated, the next signal will come out of 'Link 2' and so on), or you can lock the output to be changed externally (i.e. use an Integer figure attached the the 'Index' module, so that the output is set to this figure; 1 being 'Link 1', 2 being 'Link 2' and so on). You can also disable an output when used, or enable the switch to loop (go back to the first input upon reaching the last).


Get Velocity - These next two 'Get' modules are very useful for systems that require information about the player. Each time Get Velocity is updated, a figure is created that represents how fast the associated object is travelling. When a looped delay is attached to this, you can get an almost realtime 'speed' which I've used in the past to create footstep systems, as well as the whooshing sound you get when falling over a certain speed.


Get Location - Location gives you a 3-figure displacement on the X,Y and Z axis. This can be converted into separate figures, which can then be used in systems, such as a sound which gradually get's loader the higher you are (which would otherwise be awkward using a simple sound source). Rotation is also useful for things such as a sound-based navigational system, or attaching a light source to the player to create a torch (used in my university project).

Modify Health - When your systems start to evolve and have consequences on the player, this simple module is great for giving and taking the players health. You can either have a set rate at which health is reduced/gained, or this can be modified externally using math systems.


References - When there are many modules and many systems, things can get messy. Before you know it, there are wires flying all over kismet and it will become increasingly hard to keep track of everything. Instead, we can use reference modules. Simply, when you want a wire to connect two modules, you can instead connect the out to a reference module, and then place an event reference module to the in of the other module. The beauty of this is that you can then call up as many event reference modules as you like and they will all use the same signal as the initial reference. I would always recommend this setup for the 'Level Loaded' module, as some strange anomalies can occur when multiple Level Loaded modules are used, caused by minute time differences of initializing them.


Maths: In order to start creating more complex systems, they'll more than likely be a level of math involved. This math will not only give a better level of control over certain values, but it will also give you the ability to dynamically alter properties - that is, rather than having set values which can only be changed in development, we can connect them to objects in the 3D enviroment with mathematical systems to have numbers update automatically, during gameplay, on the fly! Breathe...

A system that integrates maths; adding and comparing floats in this example.
Ints and Floats - An important aspect of any math system in kismet is knowing the difference between figures, and how you would use them. There are 2 different types that you can use - Ints and Floats. An Int node (short for Integer) allows only for whole numbers: 1, 2, 3, 4 and so on. A Float node on the other hand allows for decimal places: 1.1, 2.45, 3.6048568 etc. Obviously, you can still work in whole numbers using a float node, but it's only advisable if there's a possibility that you may need decimal numbers.

An Int on the left; Float on right.


Good uses of Int's might be:
  • Jumping to a set position on a switch module.
  • Setting up a timer that counts in whole seconds.
  • Pre-determining a number of enemies to spawn in a level.
Good uses of Float's might be:
  • Calculating the speed of a player.
  • Calculating the distance between 2 objects.
  • Working out a delay time to coincide with the tempo of some music.
  • Changing the volume of a play sound (value is between 0-1).

Add, Subtract, Multiply, Divide and Set Modules: There are a number of different ways to achieve calculations with math nodes, and these modules allow just that. I assume you're knowledgeable enough to work out additions and subtractions, so I won't go explaining what they do, but it's definitely worth noting how they work.

For each module, there are 2 node inputs and 1 node output. These are coloured dependant on the kind of node, be it an Int or Float. In order to perform a calculation, you must have a node connected to each of these inputs and the output, as the 2 inputs will be added/subtracted/divided/multiplied, with the output node showing the result. In an instance where you'd like a cumulative calculation (the number continues to add/subtract etc), you can use 2 nodes and connect one to both an input and the output node.

Add/Subtract/Multiply/Divide operate in the same way; Left: a normal addition; Right: A cumulative addition.
Comparisons: Almost directly connected (pardon the pun) to the math modules are comparisons. These are, in effect, your 'if', 'else' and 'when' statements in object form. Simply, they compare 2 values and open/close gates depending upon certain characteristics.

A Float comparison on the left, Int comparison on the right.
As you can see, there are 3 inputs - the 'signal' input on the left and two float/int inputs on the bottom. The outputs available are what make these modules great. Not only do you have this breadth of comparison, but you can use all of these side by side, for whatever purpose you desire. So in essence, it's a multi-tasking 'if' statement!

A good use of comparison modules is to manage memory usage. If you were to have a system where by a regular heart beat was to fade up when the players health became low, you wouldn't simply have the sound looped constantly and alter the volume; you would want to turn the system on only when it was needed. In extracting the players health, you could compare it to a set level (say below 40% health) and use this to turn on the heart beat system. Similarly, when the players health reaches a comfortable level (above 40%), you can use the comparison to turn the system off.

Linking Kismet to Objects in the Editor: The final step of using kismet is being able to locate objects from your 3D environment and link them to your systems. This can work on several different levels, either through the Content Browser, or through one of the view ports. Generally, you can get away with referencing objects by physically selecting them in a view port, but some elements will require you to find them in the content browser, as you can't select or click on them.

The most basic example regarding sound is when you wish to turn a persistent ambience on or off (going in and out of a building say). Of course, you need to make sure that the ambience is located in the 3D space as an ambientSoundSimpleToggleable. Once placed, simply select the item and head back to Kismet. Here, you can either right-click and add the reference as an object, which will create a standalone variable that can be attached to modules. Alternatively, you can add a Play Sound module, and add the sound into the properties window, which will allow you to control the sound through the modules inputs.

Left: The selected ambientSound in the 3D viewport. Right: In kismet, right-clicking will give you two options to add the item; New Object Var Using [object name], and New Event Using [object name].
Conclusion: Kismet is very powerful. Even though I concentrate my efforts on audio implementation, it's hard to use it for just that alone. If you want to create a basic game with cinematics, moving objects, pickups, AI and so on, it's all possible with Kismet. The more you use it, the easier it gets, and the beauty is that you can visually build up from a very basic system to incredibly complicated ones. If you have a game style you want to achieve, it's likely you can do it. If you want to manipulate and implement audio in wacky ways, the tools are they. Have a go; you may surprise yourself.

Alex.